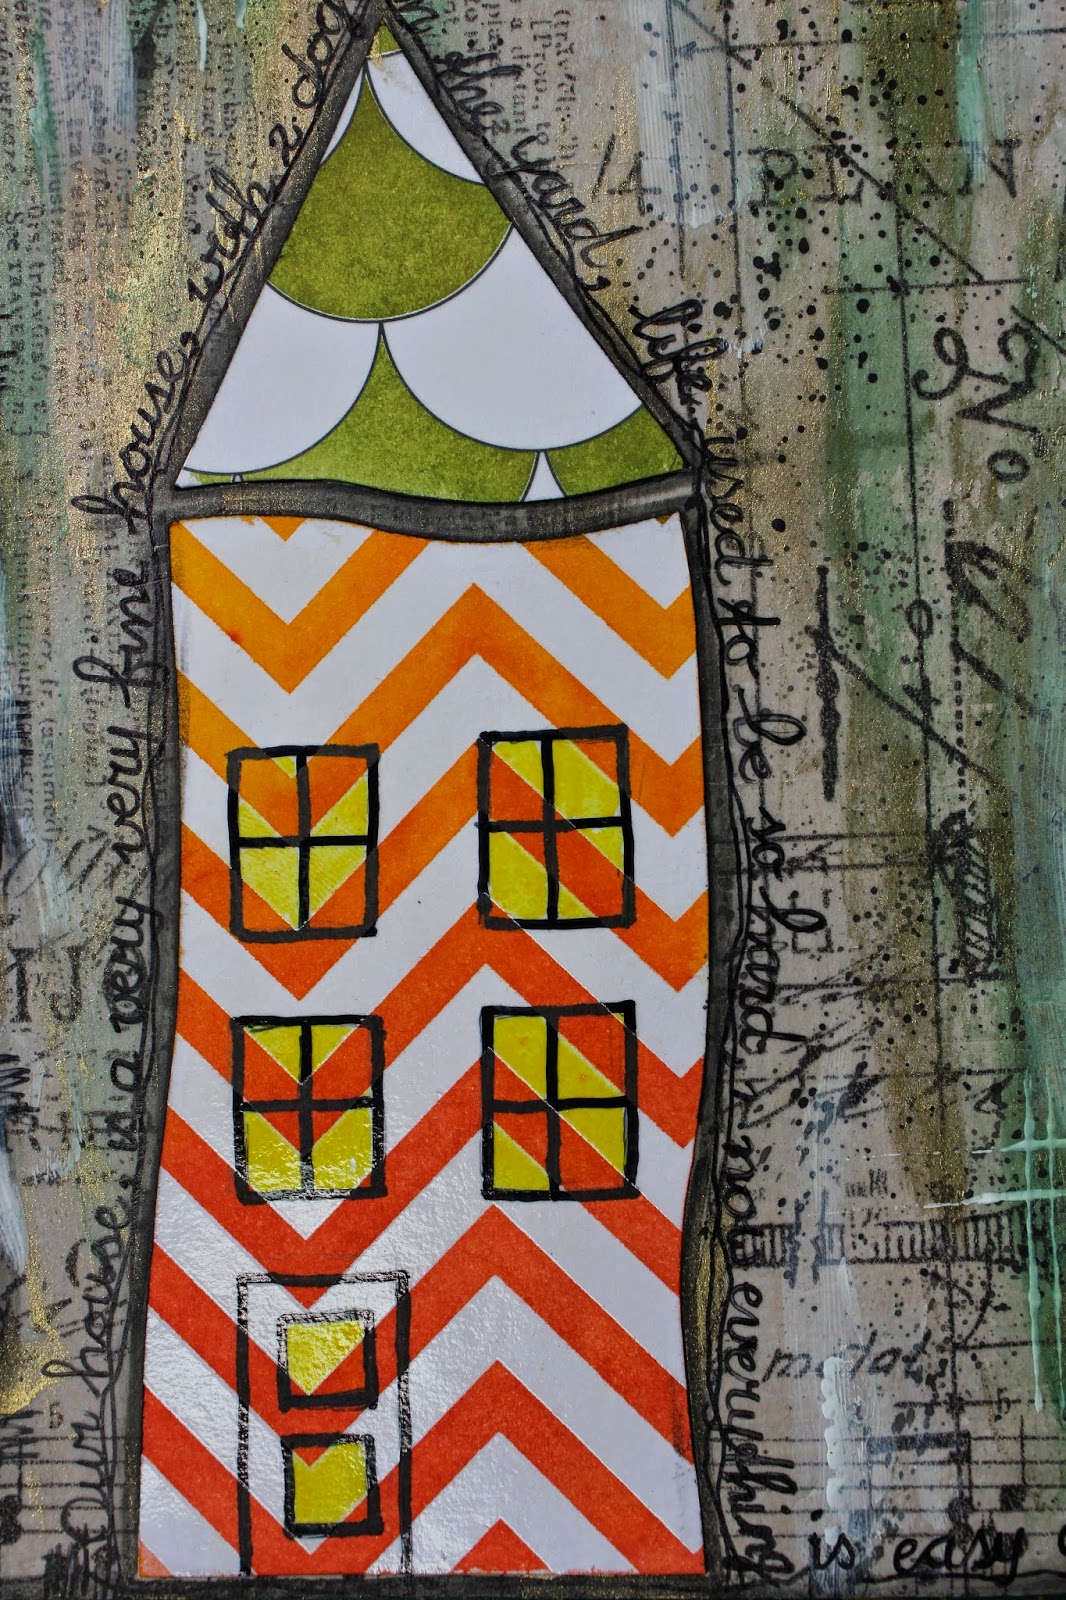
I'm on a roll here! Trying to finish te last pages in my Round Robin journal so I can pimp the cover! That would be my 2nd journal ever to get finished. The page was inspired by France Papillon, a great mixed media artist. I used the lyrics of the Crosby, Stilss, Nash & Young song 'Our House'. Slightly altered the text though, since we don't have cats but two dogs it goes: 'with two dogs in the yard....'!
The houses were made with Prima resist papers, coloured with Distress Stains and Dylusions. Those work just great together! I drew the doors and windows on with a permanent marker and made the windows yellow with a Pitt Pen.
On my T.H. tissuepaper background I smeared some golden en metallic green paints as well as some white gesso.
Hope you like it, have a great Sunday, hugs Frea
Challenges:
http://acreativeneed.wordpress.com/2014/10/04/yellow-and-orange-challenge-inspiration/
http://artbymiranchallenge.blogspot.ca/2014/10/challenge-16-anything-goes.html
http://creativecornerchallenges.blogspot.de/
http://qkrstampede.blogspot.co.uk/2014/10/qkr-stampede-challenge-107-anything-goes.html
http://catchthebugblog.blogspot.nl/2014/10/october-anything-goes-challenge.html http://www.charismacardz.blogspot.nl/2014/09/anything-but-card.html
http://dianamlarson.blogspot.nl/2014/10/dlart-october-linky-challenge.html
http://sassystudiodesigns.blogspot.nl/2014/10/dtbst-249-anything-goes.html
http://avenue613.blogspot.nl/2014/10/challenge-92-anything-goes.html
http://anythingbutacard.blogspot.ca/2014/10/celebrating-seasons-of-change-for-week.html
http://onestitchatatimechallenge.blogspot.nl/2014/10/challenge-221.html
Posts tonen met het label Faber Castel Pitt pennen. Alle posts tonen
zondag 5 oktober 2014
zaterdag 4 oktober 2014
Autumn in my home made Donna Downey album.
Hi everyone, this spread I made in my self made Donna Downey album. It's got this lovely autumn like feel to it, even though the items used are not reminiscent of autumn. Maybe is the colours, must be that!
Some close ups of details. The flowers made with a stencil and modeling paste and applying Inca Gold after drying.
The little dots by applying gesso through a stencil before applying the spray inks by LSG. The stamps are by Tim Holtz again, like my last spread.
Have a great weekend everyone! Hugs Frea
Challenges:
http://aagwat.blogspot.co.uk/2014/10/challenge-01.html
http://artbymiranchallenge.blogspot.ca/2014/10/challenge-16-anything-goes.html
http://brownsugarchallenge.blogspot.nl/2014/10/challenge-114-autumnfall.html
http://creativecornerchallenges.blogspot.de/
http://www.frosteddesigns.blogspot.nl/2014/09/fall-into-new-friday-challenge.html
http://graphitmarkers.blogspot.co.uk/2014/10/wk-40autumn-colours-graphit-colouring.html
http://qkrstampede.blogspot.co.uk/2014/10/qkr-stampede-challenge-107-anything-goes.html
http://wagsnwhiskersrubberstamps.blogspot.nl/2014/10/challenge-139-fall-colors.html
http://www.charismacardz.blogspot.nl/2014/09/anything-but-card.html
Some close ups of details. The flowers made with a stencil and modeling paste and applying Inca Gold after drying.
The little dots by applying gesso through a stencil before applying the spray inks by LSG. The stamps are by Tim Holtz again, like my last spread.
Challenges:
http://aagwat.blogspot.co.uk/2014/10/challenge-01.html
http://artbymiranchallenge.blogspot.ca/2014/10/challenge-16-anything-goes.html
http://brownsugarchallenge.blogspot.nl/2014/10/challenge-114-autumnfall.html
http://creativecornerchallenges.blogspot.de/
http://www.frosteddesigns.blogspot.nl/2014/09/fall-into-new-friday-challenge.html
http://graphitmarkers.blogspot.co.uk/2014/10/wk-40autumn-colours-graphit-colouring.html
http://qkrstampede.blogspot.co.uk/2014/10/qkr-stampede-challenge-107-anything-goes.html
http://wagsnwhiskersrubberstamps.blogspot.nl/2014/10/challenge-139-fall-colors.html
http://www.charismacardz.blogspot.nl/2014/09/anything-but-card.html
zondag 11 mei 2014
Yeahhhhh, I am this week's guest designer for Quirky Crafts!!!!!
I was really pleased when winning the Quirky Crafts Challenge, and even more pleased when asked to be theur guest designer! I received some digipapers and some digistamps to work with, and I picked this gorgeous 'peacock lady' by Alipeeps which I think is just brilliant.
I printed her out on tissue paper and coloured her in with my trusted Copics. After gluing her down on the background with matte gel medium, I painted the darkblue centers of the feathers and the greek ovals around the centers with metallic Lumière Paint. Around her face an the hair I added some shadow with a Faber Castel big brush Pitt pen.
To do the background I started with gessoing the page after which I randomly applied Rayher Antique Medium. I hadn't used it before, but it turned out to be this glue like medium and after drying it actually looked and felt like dried glue. The surface was shiny and very smooith and since I wanted to use a LSG spray I decided to add a layer of transparant gesso before spraying in order to give the spray something to hold on to. I used LSG Treasure Island Aqua spray which gave the lovely aqua shimmer in the background.
Now in the background you can still see bits of the digipaper I used. The dots were made with a TCW stencil and Copper coloured Maya Gold. The edges of the spread were distressed with a Gelato in chocolate colour. And this was the endresult (to give you an idea of the size, it was made in the small Dylusions journal).
I hope you like my spread an will start looking for challenges tomorrow. For now, it's bedtime, tomorrow is my first workday after a 2 weeks holiday. Have a great week, hugs Frea
Challenges:
http://cmdchallenge.blogspot.ca/2014/05/challenge-9.html
http://challenges4everybody.blogspot.co.uk/2014/05/challenge-41-anything-goes.html
http://avenue613.blogspot.nl/2014/05/challenge-71-anything-goes-woptional.html
http://ditziedigidesigns.blogspot.co.uk/2014/05/anything-goes-week-3.html
http://dreamvalleychallenges.blogspot.nl/2014/05/challenge-81-anything-goes.html
http://www.scribbleandscrapcrafts.blogspot.co.uk/2014/05/challenge-18-always-anything-goes.html
http://asprinkleofimagination.blogspot.co.uk/p/blog-page.html
http://alteredeclectics.blogspot.co.uk/2014/05/1st-of-may-omw.html
http://doodlepantryblog.blogspot.nl/2014/05/doodle-pantry-digital-challenge-46.html
http://justbcreativecrazy.blogspot.nl/2014/05/mays-just-because-linky-party.html
http://liastampz.blogspot.nl/2014/04/challenge-64-anything-but-card.html
http://rheddscreativespirit.blogspot.co.uk/2014/05/may-challenge.html
http://craftingattheweekend.blogspot.co.uk/2014/04/challenge-1.html
I printed her out on tissue paper and coloured her in with my trusted Copics. After gluing her down on the background with matte gel medium, I painted the darkblue centers of the feathers and the greek ovals around the centers with metallic Lumière Paint. Around her face an the hair I added some shadow with a Faber Castel big brush Pitt pen.
To do the background I started with gessoing the page after which I randomly applied Rayher Antique Medium. I hadn't used it before, but it turned out to be this glue like medium and after drying it actually looked and felt like dried glue. The surface was shiny and very smooith and since I wanted to use a LSG spray I decided to add a layer of transparant gesso before spraying in order to give the spray something to hold on to. I used LSG Treasure Island Aqua spray which gave the lovely aqua shimmer in the background.
Now in the background you can still see bits of the digipaper I used. The dots were made with a TCW stencil and Copper coloured Maya Gold. The edges of the spread were distressed with a Gelato in chocolate colour. And this was the endresult (to give you an idea of the size, it was made in the small Dylusions journal).
I hope you like my spread an will start looking for challenges tomorrow. For now, it's bedtime, tomorrow is my first workday after a 2 weeks holiday. Have a great week, hugs Frea
Challenges:
http://cmdchallenge.blogspot.ca/2014/05/challenge-9.html
http://challenges4everybody.blogspot.co.uk/2014/05/challenge-41-anything-goes.html
http://avenue613.blogspot.nl/2014/05/challenge-71-anything-goes-woptional.html
http://ditziedigidesigns.blogspot.co.uk/2014/05/anything-goes-week-3.html
http://dreamvalleychallenges.blogspot.nl/2014/05/challenge-81-anything-goes.html
http://www.scribbleandscrapcrafts.blogspot.co.uk/2014/05/challenge-18-always-anything-goes.html
http://asprinkleofimagination.blogspot.co.uk/p/blog-page.html
http://alteredeclectics.blogspot.co.uk/2014/05/1st-of-may-omw.html
http://doodlepantryblog.blogspot.nl/2014/05/doodle-pantry-digital-challenge-46.html
http://justbcreativecrazy.blogspot.nl/2014/05/mays-just-because-linky-party.html
http://liastampz.blogspot.nl/2014/04/challenge-64-anything-but-card.html
http://rheddscreativespirit.blogspot.co.uk/2014/05/may-challenge.html
http://craftingattheweekend.blogspot.co.uk/2014/04/challenge-1.html
donderdag 8 mei 2014
The month of May, and I'm actually not thát late!!
I had absolutely no inspiration for the month of May, so I decided to pick the least likely colours for the background; I used Naples Yellow Light, Naples Yellow deep and Azo Yellow Medium acrylic paint by Amsterdam..
At the bottom I stamped with an Indigo Blue stamp and green permanent ink. The 'day' flowers were made by making a stencil with the Tim Holtz tattered floral die and a sheet of transparant film. I sponged through the stencil with Golden Quinacridone Nickel Azo Gold. I went around all the flowers with a Yellow Faber Castel Big Brush Pitt pen.
At the sides I used a TCW stencil and sponged ferns with several green colours acrylic paint. I stamped some dragonflies in the background with a brown Stazon ink and used a pearlescent acrylic medium for the wings. Last but not least I used the dark green permanent ink around the spread to 'frame' the spread.
Hope you like my month of May, considering I started with a blank, it didn't turn out too bad, though I must say I made better pages LOL! Hugs Frea
Challenges:
http://dianamlarson.blogspot.nl/2014/05/dlart-may-linky-challenge.html
http://www.4craftychicks.blogspot.nl/2014/05/4-ccc-193-flowers.html
http://4kraftygirlzchallenges.blogspot.co.uk/2014/05/challenge-17.html
http://delightfulsketches.blogspot.nl/2014/05/weekly-challenge-petal-power.html
http://www.dreamweaverstencils.blogspot.nl/2014/05/dreamweaver-designs-are-to-die-for.html
http://eclecticpaperie.blogspot.ca/2014/05/eplay-challenge-get-stenciled.html
http://craftingbydesigns.blogspot.nl/2014/04/may-anything-goes-challenge.html
http://craftycreationschallenges.blogspot.nl/2014/04/262-anything-but-card.html
http://scrappers-delights-challenge-blog.blogspot.co.uk/2014/05/challenge-22-anything-goes.html
http://www.simonsaysstampblog.com/wednesdaychallenge/simon-says-spring-flowers/
http://www.craftysentiments.blogspot.nl/2014/05/anything-goes.html
http://www.lovesrubberstampschallenges.com/2014/05/challenge-102-anything-goes.html
http://www.ttcrd.blogspot.nl/2014/05/ttcrd-challenge-may-6-12.html
http://thepapernestdollschallenge.blogspot.nl/2014/04/ch-9-and-500-follower-giveaway.html
http://www.sparklingblackrose-craftmylife.blogspot.co.uk/2014/04/all-crafts-challenge-aprilmay.html
http://craftingfromtheheartchallengeblog.blogspot.nl/2014/05/challenge-17-anything-goes.html
http://scrapbookstampsocietychallengeblog.blogspot.nl/2014/04/challenge-40-anything-goes-option-use.html
At the bottom I stamped with an Indigo Blue stamp and green permanent ink. The 'day' flowers were made by making a stencil with the Tim Holtz tattered floral die and a sheet of transparant film. I sponged through the stencil with Golden Quinacridone Nickel Azo Gold. I went around all the flowers with a Yellow Faber Castel Big Brush Pitt pen.
At the sides I used a TCW stencil and sponged ferns with several green colours acrylic paint. I stamped some dragonflies in the background with a brown Stazon ink and used a pearlescent acrylic medium for the wings. Last but not least I used the dark green permanent ink around the spread to 'frame' the spread.
Hope you like my month of May, considering I started with a blank, it didn't turn out too bad, though I must say I made better pages LOL! Hugs Frea
Challenges:
http://dianamlarson.blogspot.nl/2014/05/dlart-may-linky-challenge.html
http://www.4craftychicks.blogspot.nl/2014/05/4-ccc-193-flowers.html
http://4kraftygirlzchallenges.blogspot.co.uk/2014/05/challenge-17.html
http://delightfulsketches.blogspot.nl/2014/05/weekly-challenge-petal-power.html
http://www.dreamweaverstencils.blogspot.nl/2014/05/dreamweaver-designs-are-to-die-for.html
http://eclecticpaperie.blogspot.ca/2014/05/eplay-challenge-get-stenciled.html
http://craftingbydesigns.blogspot.nl/2014/04/may-anything-goes-challenge.html
http://craftycreationschallenges.blogspot.nl/2014/04/262-anything-but-card.html
http://scrappers-delights-challenge-blog.blogspot.co.uk/2014/05/challenge-22-anything-goes.html
http://www.simonsaysstampblog.com/wednesdaychallenge/simon-says-spring-flowers/
http://www.craftysentiments.blogspot.nl/2014/05/anything-goes.html
http://www.lovesrubberstampschallenges.com/2014/05/challenge-102-anything-goes.html
http://www.ttcrd.blogspot.nl/2014/05/ttcrd-challenge-may-6-12.html
http://thepapernestdollschallenge.blogspot.nl/2014/04/ch-9-and-500-follower-giveaway.html
http://www.sparklingblackrose-craftmylife.blogspot.co.uk/2014/04/all-crafts-challenge-aprilmay.html
http://craftingfromtheheartchallengeblog.blogspot.nl/2014/05/challenge-17-anything-goes.html
http://scrapbookstampsocietychallengeblog.blogspot.nl/2014/04/challenge-40-anything-goes-option-use.html
vrijdag 22 november 2013
When you don't know where you're going, any road will get you there.
I am such an Alice fan, and this quote is from Alice in Wonderland, love it! I am also a huge France Papillon fan, and watch all her video's which gives me loads of inspiration, and thats how this page got started. I began this page with a coat of gesso after which I painted the entire page from lightpink at the top to darker and bruight pink on the bottom. I then 'stamped' with embossing ink and several lids of spraycans and other containers. I overlapped them and went for an imperfect look, and embossed with Ultra thick clear embossing powder.
Then I coated the entire page with a coat of transparant gesso. That has a slightly absorbant quality which I wanted for the sprays I was going to use. I then sprayed the entire page with Lindy's Stamp Gang Fuzzy Navel Peach and a little bit of Dylusions Squuzes Orange here and there. I tried to take a picture to show of the lovely shimmer on the page, I hope you can see it.
I stamped this cute Stampotique fellow because of his sign, which I thought would be perfect for stmaping some questionmarks on. I coloured him with my trusted Copics.
On the right side of the page I added a large questionmark brad and on the inclusion I added a gorgeous butterflu with some bling. I used a grey Pitt Pen to make a slight shadow around the circles and the stamped image. On the edges of my spread I distressed with some Distress Ink Black Soot.
I added some paintsplatters with diluted black acrylic paint and used an old giftcard to make some lines here and there. I printed the quote on craft cardstock, but regretted that later on. It was very hard to glue down. My journal is quite warped, I have only 5 spreads left and it's pretty thick, so it was hard to glue down.
So that was it for today, hope you enjoyed my page, and thank you France for your inspiration.
Challenges:
http://stampotiquedesignerschallenge.blogspot.nl/2013/11/sdc-november-2013-challenge-links.html
http://blog.docerelashop.com/2013/11/november-stamp-release-challenge-50_22.html
http://crafts4eternity.blogspot.nl/2013/11/r151-glitter-and-sparkle.html
http://brownsugarchallenge.blogspot.nl/2013/11/challenge-69-anything-goes.html
http://delightfulsketches.blogspot.nl/2013/11/weekly-challenge-anything-but-card.html
http://4kraftygirlzchallenges.blogspot.co.uk/
http://www.4craftychicks.blogspot.nl/2013/11/lets-make-it-anything-goes.html
http://www.baffies-kreativladen.blogspot.de/2013/11/challenge-26-november-dt-call.html
http://www.cardsbyladyanne.com/2/post/2013/11/last-anything-goes-stamp-challenge.html
http://whimsyinspires.blogspot.nl/2013/11/challenge-65-anything-goes-rubber-team.html
http://scrappers-delights-challenge-blog.blogspot.co.uk/2013/11/challenge-11-anything-goes.html
http://pennyschallenges.blogspot.nl/2013/11/pennys-challenge-153-winners.html
Then I coated the entire page with a coat of transparant gesso. That has a slightly absorbant quality which I wanted for the sprays I was going to use. I then sprayed the entire page with Lindy's Stamp Gang Fuzzy Navel Peach and a little bit of Dylusions Squuzes Orange here and there. I tried to take a picture to show of the lovely shimmer on the page, I hope you can see it.
I stamped this cute Stampotique fellow because of his sign, which I thought would be perfect for stmaping some questionmarks on. I coloured him with my trusted Copics.
On the right side of the page I added a large questionmark brad and on the inclusion I added a gorgeous butterflu with some bling. I used a grey Pitt Pen to make a slight shadow around the circles and the stamped image. On the edges of my spread I distressed with some Distress Ink Black Soot.
I added some paintsplatters with diluted black acrylic paint and used an old giftcard to make some lines here and there. I printed the quote on craft cardstock, but regretted that later on. It was very hard to glue down. My journal is quite warped, I have only 5 spreads left and it's pretty thick, so it was hard to glue down.
So that was it for today, hope you enjoyed my page, and thank you France for your inspiration.
Challenges:
http://stampotiquedesignerschallenge.blogspot.nl/2013/11/sdc-november-2013-challenge-links.html
http://blog.docerelashop.com/2013/11/november-stamp-release-challenge-50_22.html
http://crafts4eternity.blogspot.nl/2013/11/r151-glitter-and-sparkle.html
http://brownsugarchallenge.blogspot.nl/2013/11/challenge-69-anything-goes.html
http://delightfulsketches.blogspot.nl/2013/11/weekly-challenge-anything-but-card.html
http://4kraftygirlzchallenges.blogspot.co.uk/
http://www.4craftychicks.blogspot.nl/2013/11/lets-make-it-anything-goes.html
http://www.baffies-kreativladen.blogspot.de/2013/11/challenge-26-november-dt-call.html
http://www.cardsbyladyanne.com/2/post/2013/11/last-anything-goes-stamp-challenge.html
http://whimsyinspires.blogspot.nl/2013/11/challenge-65-anything-goes-rubber-team.html
http://scrappers-delights-challenge-blog.blogspot.co.uk/2013/11/challenge-11-anything-goes.html
http://pennyschallenges.blogspot.nl/2013/11/pennys-challenge-153-winners.html
woensdag 28 augustus 2013
Pink birds make me happy!!
They do, especially the ones I added to this layout. Now it started by watching a video on the Paper Artsy blog. Should you want to see, here's the link: http://www.youtube.com/watch?v=-sgBOi_DBkM&feature=c4-overview&list=UUs9MVeZCc8hFqi2_T7ygsfA
This was made by using a stone background stencil and plastering paste (they use grunge paste in the video which I didn't have and I found that normal texture paste doesn't work, you need something firmer than that. So I bought a cheap tube of plastering paste and that worked wonderfully. After pasting it through the stencil you have to leave the stencil on, and then take a stamp (I used a script stamp) which you have to wet slightly (not too much), and then stamp in the wet paste. After you stamped to your liking you remove the stencil.
After drying I painted with a combination of acrylic paints I liked. Then I diluted a dark purple paint with some water, thus creating a wash which collects in the deeper parts. And then as a final step, after that has dried thouroughly, you sand the stencilled parts which brings out some white here and there. Don't you just love the effect of this technique??
Now for the birds I mixed a bright pink embossingpower with a glittery embossingpower. The pink was too bright for my liking, and the glitterpower too pale and translucent. Love this combination though. So here's a picture of the other side of the inclusion showing the text on the other side:
Around the edges of the birds I used a grey Faber Castel Pitt pen to make some shadow and round the edges of the pages I used a brown Pitt pen in order to 'frame' the pages. The Pink birds words were made with pink chipboard letters, and the words on this picture were stamped on. I added a background stamp here and there on the page in purple Stazon. And on the left page you see a pink feather, and yes, it's a real one.
I hope you like my spread, I was very happy with this one, it just came together so easily! Have a great Wednesday, hugs Frea
Challenges:
http://partytimetuesdays.blogspot.nl/2013/08/ptt135-anything-goes.html
http://craft-roomchallenge.blogspot.fi/2013/08/something-new.html
http://lexiscreations.blogspot.nl/2013/08/challenge-97-and-winners-of-96.html
http://fitztownchallengeblog.blogspot.fi/2013/08/challenge-7-add-sparkles.html
http://createdwithlovechallenges.blogspot.nl/2013/08/cwlc-55-anything-goes.html
http://www.craftindesertdivas.com/search/label/Linky%20Party
http://cheerfulstamppad.blogspot.nl/2013/08/challenge-67-your-choice.html
http://www.twistedtuesdaychallenges.blogspot.nl/2013/08/2tc57-pink-as-all-outdoors.html
This was made by using a stone background stencil and plastering paste (they use grunge paste in the video which I didn't have and I found that normal texture paste doesn't work, you need something firmer than that. So I bought a cheap tube of plastering paste and that worked wonderfully. After pasting it through the stencil you have to leave the stencil on, and then take a stamp (I used a script stamp) which you have to wet slightly (not too much), and then stamp in the wet paste. After you stamped to your liking you remove the stencil.
After drying I painted with a combination of acrylic paints I liked. Then I diluted a dark purple paint with some water, thus creating a wash which collects in the deeper parts. And then as a final step, after that has dried thouroughly, you sand the stencilled parts which brings out some white here and there. Don't you just love the effect of this technique??
Now for the birds I mixed a bright pink embossingpower with a glittery embossingpower. The pink was too bright for my liking, and the glitterpower too pale and translucent. Love this combination though. So here's a picture of the other side of the inclusion showing the text on the other side:
Around the edges of the birds I used a grey Faber Castel Pitt pen to make some shadow and round the edges of the pages I used a brown Pitt pen in order to 'frame' the pages. The Pink birds words were made with pink chipboard letters, and the words on this picture were stamped on. I added a background stamp here and there on the page in purple Stazon. And on the left page you see a pink feather, and yes, it's a real one.
I hope you like my spread, I was very happy with this one, it just came together so easily! Have a great Wednesday, hugs Frea
Challenges:
http://partytimetuesdays.blogspot.nl/2013/08/ptt135-anything-goes.html
http://craft-roomchallenge.blogspot.fi/2013/08/something-new.html
http://lexiscreations.blogspot.nl/2013/08/challenge-97-and-winners-of-96.html
http://fitztownchallengeblog.blogspot.fi/2013/08/challenge-7-add-sparkles.html
http://www.craftindesertdivas.com/search/label/Linky%20Party
http://cheerfulstamppad.blogspot.nl/2013/08/challenge-67-your-choice.html
http://www.twistedtuesdaychallenges.blogspot.nl/2013/08/2tc57-pink-as-all-outdoors.html
zaterdag 24 augustus 2013
The letter O at the Craft Barn and I picked 'ornament'.
Right ladies, this time I actually am on time LOL! So, I picked the word 'ornament', and for this page I made my own ornaments.
I started by gessoing the page making sure I left the word open. Then I took some Faber Castel Gelatos in the colours Guava, Watermelon and Raspberry. I used them dry and blended the colours with my fingers which works wonderfully when you do it on a gessoed later. The grungy hearts you see in the background were made with a stencil and a baby wipe which takes away the gelato.
I marked my work choice with a permanent pen and used Indian Ink to make the ink splatters. The strips you see are leftover design papers which I glued down with gel medium before gessoing the page. I accentuated the strips with a Faber Castel Pitt pen in the olour Middle Purple Pink no. 125.
Here is a close up picture of one of my homemade ornaments. I used Mold Mods to make them, painted them black and added some Rubb and Buff in a gold colour.
I'm pretty happy with the result and I especially like those ornaments. Well, I'm off to enter that Craft Barn Challenge. Have a great weekend you all!
Hugs Frea
http://thecraftbarnblog.blogspot.ca/2013/08/alpha-dictionary-challenge-letter-o.html
I started by gessoing the page making sure I left the word open. Then I took some Faber Castel Gelatos in the colours Guava, Watermelon and Raspberry. I used them dry and blended the colours with my fingers which works wonderfully when you do it on a gessoed later. The grungy hearts you see in the background were made with a stencil and a baby wipe which takes away the gelato.
I marked my work choice with a permanent pen and used Indian Ink to make the ink splatters. The strips you see are leftover design papers which I glued down with gel medium before gessoing the page. I accentuated the strips with a Faber Castel Pitt pen in the olour Middle Purple Pink no. 125.
Here is a close up picture of one of my homemade ornaments. I used Mold Mods to make them, painted them black and added some Rubb and Buff in a gold colour.
I'm pretty happy with the result and I especially like those ornaments. Well, I'm off to enter that Craft Barn Challenge. Have a great weekend you all!
Hugs Frea
http://thecraftbarnblog.blogspot.ca/2013/08/alpha-dictionary-challenge-letter-o.html
vrijdag 24 mei 2013
Attempting soft pastels to draw a face, and I feel a candy coming on... Pastelkrijt uitproberen om een gezicht te tekenen en ik voel een candy opkomen....
First of all a warm welcome to my new followers; I never thought I'd be up to almost 40 followers only a couple of weeks after starting this new blog! Just keep your eyes wide open, because I can feel a candy coming on and it will be fabby, I can tell you ladies!!!
Anyhow, some of you may have seen my first attempt at painting a face with acrylics, and it was really tough, trust me. So I decided to do my second one not in acryllics but using soft pastel crayons. I can tell you that blending is a lot simpler and I quite like the result. I used my Andrea Gomoll stamps from the online class I've been doing again for the eyes, nose and mouth. Now brace yourself for loads of picture cause I photographed all the stages. But here's the endpicture to start with, for those who can not do the entire 'ride' LOL!!
This was the first colour set up, eyes and mouth not yet coloured in and details not added to the hair yet.
Here's a close up of the eyes which I coloured with coloured pencils.
Here's a picture with some stuff pasted to the background: I used old book pages and then stamped with Black Stazon and a background stamp with random pattern as well as a key stamp. I added some shadow to the hair with a brown Faber Castell Pitt pen and texture with brown pencils.
I coloured the background using Faber Castell gelato's in the colours Lavender, Lime, Spearmint and Pistachio. You just scribble it on and then take a wet brush and activate the colour. It gives an aquarel like wash but the colours are very vibrant. I then used a background stamp with circles which I stamped with gesso. After drying I used a black Faber Castel Pitt pen and made black circles all around which I faded with my finger. Love the effect, really adds dimention.
So, I hope you like my 2nd attempt at this. I still have a long way to go but I must say I really love doing this. After the Dutch translation I will be on the look out for challenges I might enter. Have a great weekend everyone. Hugs Frea
Mijn tweede gezicht meisjes, en deze heb ik gemaakt met zacht pastelkrijt. Het is veel makkelijker om kleuren in elkaar over te laten vloeien, dat is een feit. De ogen en mond zijn weer gestempeld met de stmepels van mijn online cursus voor gezichten tekenen en die heb ik ingekleurd met potlood, daar kun je meer detail mee toevoegen. In het haar heb ik schaduw toegevoegd met een bruine Faber Castell Pitt pen en textuur met diverse kleuren buin potlood. Voor de achtergrond heb ik eerst gescheurde stukken uit een heel oud boek opgeplakt en vervolgens heb ik met zwarte Stazon gestempeld met een achtergrond stempel en een sleutel stempel. Vervolgens heb ik kleur aangebracht met Faber Castell Gelato's. Dat zijn een soort labello stiften dit je hier en daar een beetje opzet, waarna je met een kwast en wat water eroverheen gaat waardoor je de kleuren activeert. Het geeft een beetje een aquareleffect, maar de kleuren zijn heel levendig. Toen de achtergrond gedroogd was heb ik met een achtergrondstempel met cirkels in verschillende maten en gesso gestempeld. Na droging ben ik met een zwarte Pitt pen rond de cirkels gegaan; het mooie van die stiften is dat ze gevuld zijn met oostindische inkt, en als je op een ondergrond werkt, kun je deze inkt als het ware uitvegen met je vinger. Ik vind het een leuk effect, als een soort schaduw zeg maar. Nou dat was 'm weer voor vandaag meisjes. Ik wens jullie allemaal een super weekend toe, met hopelijk iets lente-achtig weer dan vandaag! Liefs, Frea
Challenges:
http://pennyschallenges.blogspot.nl/2013/05/welcome-to-pennys-challenge-128.html
http://whimsyinspires.blogspot.nl/2013/05/monthly-challenge-59-whimsy-stamps.html
http://www.papercraftstar.blogspot.nl/2013/05/challenge-146.html
http://addictedtostamps-challenge.blogspot.com.au/2013/05/challenge-46-anything-goes.html
http://carabbiemomentsofcraft.blogspot.co.uk/
http://anythingchallenge.blogspot.nl/2013/05/challenge-93-handmade-backgrounds.html
http://bearlymine-challenges.blogspot.nl/2013/05/anything-goes.html
http://craft-roomchallenge.blogspot.nl/2013/05/stamp-your-own-backgroundbackground.html
http://www.lovesrubberstampschallenges.com/2013/05/challenge-53-anything-but-card.html
http://www.ladyanneschallenges.com/4/post/2013/05/4th-anything-goes-challenge.html
http://ppp-makeitmonday.blogspot.nl/2013/05/mim-141-with-bugaboo-stamps.html
http://sparklingblackrose-craftmylife.blogspot.co.uk/2013/04/my-all-crafts-challenge-5.html
Anyhow, some of you may have seen my first attempt at painting a face with acrylics, and it was really tough, trust me. So I decided to do my second one not in acryllics but using soft pastel crayons. I can tell you that blending is a lot simpler and I quite like the result. I used my Andrea Gomoll stamps from the online class I've been doing again for the eyes, nose and mouth. Now brace yourself for loads of picture cause I photographed all the stages. But here's the endpicture to start with, for those who can not do the entire 'ride' LOL!!
This was the first colour set up, eyes and mouth not yet coloured in and details not added to the hair yet.
Here's a close up of the eyes which I coloured with coloured pencils.
Here's a picture with some stuff pasted to the background: I used old book pages and then stamped with Black Stazon and a background stamp with random pattern as well as a key stamp. I added some shadow to the hair with a brown Faber Castell Pitt pen and texture with brown pencils.
I coloured the background using Faber Castell gelato's in the colours Lavender, Lime, Spearmint and Pistachio. You just scribble it on and then take a wet brush and activate the colour. It gives an aquarel like wash but the colours are very vibrant. I then used a background stamp with circles which I stamped with gesso. After drying I used a black Faber Castel Pitt pen and made black circles all around which I faded with my finger. Love the effect, really adds dimention.
So, I hope you like my 2nd attempt at this. I still have a long way to go but I must say I really love doing this. After the Dutch translation I will be on the look out for challenges I might enter. Have a great weekend everyone. Hugs Frea
Mijn tweede gezicht meisjes, en deze heb ik gemaakt met zacht pastelkrijt. Het is veel makkelijker om kleuren in elkaar over te laten vloeien, dat is een feit. De ogen en mond zijn weer gestempeld met de stmepels van mijn online cursus voor gezichten tekenen en die heb ik ingekleurd met potlood, daar kun je meer detail mee toevoegen. In het haar heb ik schaduw toegevoegd met een bruine Faber Castell Pitt pen en textuur met diverse kleuren buin potlood. Voor de achtergrond heb ik eerst gescheurde stukken uit een heel oud boek opgeplakt en vervolgens heb ik met zwarte Stazon gestempeld met een achtergrond stempel en een sleutel stempel. Vervolgens heb ik kleur aangebracht met Faber Castell Gelato's. Dat zijn een soort labello stiften dit je hier en daar een beetje opzet, waarna je met een kwast en wat water eroverheen gaat waardoor je de kleuren activeert. Het geeft een beetje een aquareleffect, maar de kleuren zijn heel levendig. Toen de achtergrond gedroogd was heb ik met een achtergrondstempel met cirkels in verschillende maten en gesso gestempeld. Na droging ben ik met een zwarte Pitt pen rond de cirkels gegaan; het mooie van die stiften is dat ze gevuld zijn met oostindische inkt, en als je op een ondergrond werkt, kun je deze inkt als het ware uitvegen met je vinger. Ik vind het een leuk effect, als een soort schaduw zeg maar. Nou dat was 'm weer voor vandaag meisjes. Ik wens jullie allemaal een super weekend toe, met hopelijk iets lente-achtig weer dan vandaag! Liefs, Frea
Challenges:
http://pennyschallenges.blogspot.nl/2013/05/welcome-to-pennys-challenge-128.html
http://whimsyinspires.blogspot.nl/2013/05/monthly-challenge-59-whimsy-stamps.html
http://www.papercraftstar.blogspot.nl/2013/05/challenge-146.html
http://addictedtostamps-challenge.blogspot.com.au/2013/05/challenge-46-anything-goes.html
http://carabbiemomentsofcraft.blogspot.co.uk/
http://anythingchallenge.blogspot.nl/2013/05/challenge-93-handmade-backgrounds.html
http://bearlymine-challenges.blogspot.nl/2013/05/anything-goes.html
http://craft-roomchallenge.blogspot.nl/2013/05/stamp-your-own-backgroundbackground.html
http://www.lovesrubberstampschallenges.com/2013/05/challenge-53-anything-but-card.html
http://www.ladyanneschallenges.com/4/post/2013/05/4th-anything-goes-challenge.html
http://ppp-makeitmonday.blogspot.nl/2013/05/mim-141-with-bugaboo-stamps.html
http://sparklingblackrose-craftmylife.blogspot.co.uk/2013/04/my-all-crafts-challenge-5.html
Abonneren op:
Posts (Atom)
